Uncategorized

Which programming language has the best package manager?

Open Source License Compliance & Security

I have to work with a lot (9) of different package managers at my daily work at VersionEye. Part of our mission is it to make manual updating of dependencies extinct, because it’s a manual and time consuming task which nobody enjoys. That’s why we are building a notification system for open source software libraries to make Continuous Updating easy and fun. And since we support several programming languages – 8 at this point! – I get to write crawlers and parsers for all of them. To give you a better overview over the strengths and weaknesses of these package managers, I picked the most popular one for each language and will compare them. The contenders are:

  • RubyGems / Bundler (Ruby)
  • PIP / PyPI (Python)
  • Packagist / Composer (PHP)
  • NPM (Node.JS)
  • Bower (JS, CSS, HTML)
  • CocoaPods (Objective-C)
  • Maven (Java)
  • Lein (Clojure)

What are package managers?

Package managers are tools for software…

View original post 3,171 more words

Integrate Ionic in Existing Angular Project

Stack 24/7

Angular Project

I just finished my project, written in Angular and although it runs on mobile browsers, it needs to be deployed as a native application. The choice is obvious, Ionic.

I’m integrating Ionic for Android development, but it’s optional. You don’t have to prepare your Ionic project for Android development, if you don’t want to. The same concept can also be used to prepare your project for iOS development.

This applies to:

  • Angular 7.
  • Ionic 5.
  • Java SDK 8 update 202.
  • Android SDK 9.0 (API level 28)
  • Android Studio 3.3.2

Here’s my approach integrating Ionic in my Angular project.

Bring-in Ionic

The step includes creating a new project using Ionic CLI, I’m going to refer it as Ionic project while my original Angular project as, well, Angular project.

  • In your Angular project, update all npm packages, to the latest major if you can. This is to avoid version conflict…

View original post 208 more words

Show a single WordPress article post in an Ionic Angular app.

Stephen Monro's blog

It took me a little while to do this nicely, but I’m happy with this version:    This will help you get a specific WP post with a wp_id.

This is not a full example, but close enough. If you know what you are doing, this should be easy for you.

I’m calling this code from another page which will link to the WP article.

<a style="width:100%"style="text-decoration:none;"class="item"href="#"(click)="OpenSinglePost(6872, 'Custom Article title ')">Show the Article</a>
The code behind on the .ts file:
OpenSinglePost(postid, pagetitle: string)
{
  this.navCtrl.push(WpArticleItemPage, {postId: postid, pagetitle: pagetitle });
}

Showing the actual WP article page:

wp-article-item.ts

import { Component } from '@angular/core'; import { IonicPage, NavController, NavParams, LoadingController, Loading } from 'ionic-angular'; import { ProgressHttp } from "angular-progress-http"; @IonicPage() @Component({ selector: 'page-wp-article-item', templateUrl: 'wp-article-item.html', }) export class WpArticleItemPage { postId: number; loader: Loading; post_title: string; post_content: string; url: string; constructor( public navCtrl: NavController, public navParams: NavParams, public loadingCtrl: LoadingController…

View original post 138 more words

How to Configure Dynamic Environment in angular

Frensol Tech

I usually do “.environment.ts” files to set environments. When i build the code I do 3 builds those are dev, test and production. Single build is not possible for all environments i did two approaches to set environments. I will explain both here.

Method 1:

If you know your Test, Dev and production URLs before build you use this method. This is Static one. First Create a project using below command.

ng new dynamic-envs

Go to newly created project and Create a static service using below command

ng g s services/env1

Then Identify the current url and set your environment according to that.

import { Injectable } from '@angular/core'; import {PlatformLocation } from '@angular/common'; @Injectable({ providedIn: 'root' }) export class Env1Service { constructor(public platformLocation: PlatformLocation) { } getEnv() { /** Identify current url */ const currentURL = (this.platformLocation as any).location.origin; /** set envronment default dev */ let envs = {apiURL:…

View original post 391 more words

How to do custom format dates in React Js

Frensol Tech

First Create New React Project using below command

create-react-app date-format

cd date-format

Create functional component named as date-format.js

import React from ‘react’;
const Date = (props) =>{
// ============ Code Here ==========
}
export default Date;

Create Array with all months Data

const montsArr = [“”,”January”, “February”, “March”, “April”, “May”, “June”, “July”, “August”, “September”, “October”, “November”, “December”];

Get all input objects and save to constants

const inputformat = props.input.split(‘-‘);
const outputformat = props.output.split(props.outputDelemeter);
const dateval = props.data.split(‘-‘);
const dateObj = {};

Construct date Object with all parameters using below loop

dateval.forEach((element, i) => {
dateObj[inputformat[i]] = element;
switch(inputformat[i]) {
case ‘M’:
dateObj.m = montsArr.findIndex(v=> v === element);
break;
case ‘m’:
dateObj.M = montsArr[Number(element)];
break;
case ‘y’:
dateObj.Y = ’20’+element;
break;
case ‘Y’:
dateObj.y = element.substring(0,2);
break;
case ‘d’:
let daysurfex = ‘th’;
if(Number(element) === 1 || Number(element) === 21){
daysurfex = ‘st’;
} else

View original post 292 more words

How to convert HTML Template to React Js Template

Frensol Tech

In this Post I am explains about Basic HTML template to React Js Template conversion.

First you need to install sample React Js Project using below command.

npx create-react-app html-to-react-app

Take your HTML template (I downloaded My HTML template from https://templated.co/industrious).

Create two folders “src/assets” and “public/assets” in your react project.

Copy all your HTML template js files to “public/assets” folder.

Copy all your HTML template assets (Except js files) to “src/assets” folder.

Remove all the content in “App.css” and import all your css files in “App.css” using “@import” statement.

Import all your scripts to “public/index.html” file using script tag (http://abc.js)

In App.js Write below code.

return (
/* Your Template index.html code */
);

Remove all HTML comments.
Close all self closed tags properly.
change all “class” attributes to “className”

Thank you..

View original post

How to convert HTML Template to Angular 6 Template

Frensol Tech

First, download any HTML Template from the web. (I downloaded from here).

Create an Angular application using angular-cli

ng new angular-template

Copy all the folders and files in downloaded template past it in src/assets folder(Except HTML files).

Then Include these files into angular.json file scripts and styles section.

“styles”: [
“src/styles.css”,
“src/assets/css/custom.css”,
“src/assets/vendor/bootstrap/css/bootstrap.min.css”,
“src/assets/vendor/font-awesome/css/font-awesome.min.css”,
“src/assets/css/fontastic.css”,
“src/assets/css/grasp_mobile_progress_circle-1.0.0.min.css”,
“src/assets/vendor/malihu-custom-scrollbar-plugin/jquery.mCustomScrollbar.css”,
“src/assets/css/style.default.css”
],
“scripts”: [
“src/assets/vendor/jquery/jquery.min.js”,
“src/assets/vendor/popper.js/umd/popper.min.js”,
“src/assets/vendor/bootstrap/js/bootstrap.min.js”,
“src/assets/js/grasp_mobile_progress_circle-1.0.0.min.js”,
“src/assets/vendor/jquery.cookie/jquery.cookie.js”,
“src/assets/vendor/chart.js/Chart.min.js”,
“src/assets/vendor/jquery-validation/jquery.validate.min.js”,
“src/assets/vendor/malihu-custom-scrollbar-plugin/jquery.mCustomScrollbar.concat.min.js”,
“src/assets/js/charts-home.js”,
“src/assets/js/front.js”
]
Now create template layout using components
ng g component components/layout/header
ng g component components/layout/sidemenu
ng g component components/layout/footer
Now create site components

ng g component components/site/home
ng g component components/site/charts
ng g component components/site/forms
ng g component components/site/login
ng g component components/site/register
ng g component components/site/tables

Analyze downloaded code and past segregate it into the layout.

side menu code past into sidemenu.component.html

header code past into header.component.html

footer code past into footer.component.html

Main contains past in site…

View original post 188 more words

Dojo vs JQuery vs MooTools vs Prototype Performance Comparison

Son Do's Blog

As part of my Mootools lecture at Codecamp I showed a brief speed comparison between the most used Javascript Frameworks running in the major browsers. Now as the Mootools team has extended their performance test tool (slickspeed) it is time to revise my benchmarks and extend them over more browser/platforms.

Test results (Lower is better):

*For example FF (XP-NA) is Firefox 2.0.0.12 with no addons (extensions) enabled running under Windows XP

You can check the actual numbers (in ms) and the full browsers information in the table bellow:

Dojo 1.0.2JQuery 1.2.3MooTools 1.2beta2Prototype 1.6.0.2
Mozilla Firefox 2.0.0.12 – no addons – winxp128266115259
Mozilla Firefox 2.0.0.12 – winxp144290127260
Mozilla Firefox 2.0.0.12 – linux253438255384
Opera 9.26 – winxp32136148194
Opera 9.26 – linux110188238364
Internet Explorer 7 –…

View original post 152 more words

Syntax highlighting for Drupal module files in Notepad++

Code Caravan

Notepad++ does not recognize Drupal module code files (.module) as php source code files, so php syntax highlighting is absent for these files. In this post I will show you how to configure Notepad++ to recognize .module files as php source code files.

Open Notepad++ with root / administrator privileges. This is because the configuration changes will involve indirectly editing Notepad++’s core system files, which require root privileges to edit.

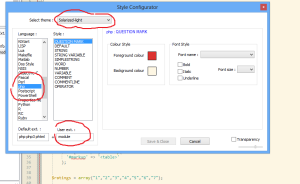
Go to Settings -> Style Configurator.

configuration

From the top portion, of the dialog box, select the theme for which you want to apply your style.

Select php from the language selection pane.

In the lower part of the dialog box is a list of the extensions that this theme recognizes as php source code files. Go ahead and add module as another extension. Save. If any module file is already open in Notepad++, close and reopen it.

Happy coding!

View original post